


Needed to create a custom media player as per the company’s design specifications. I came across the Plyr.io library which seemed very promising but was somewhat difficult to integrate, mostly because I couldn’t find all the information I needed in one place. Put it together eventually and decided to share.
This article will walk you through all the steps required to implement your own custom media/video player with the plyr.io library.
First off, would be good to go through the documentation just to get a little familiar with the library, but if you don’t want to that’s fine. This tutorial will be more than enough!
Let’s get started.
Installation and setup
Using npm or yarn, install plyr.
- yarn install plyr
Include the plyr.css stylesheet into your <head>.
<link rel="stylesheet" href="path/to/plyr.css" /> Or, if you’d like to use the Plyr CDN for default styling, go ahead and do this.
<link rel="stylesheet" href="https://cdn.plyr.io/3.7.8/plyr.css" />
Creating your SVG sprite
Because you’ll be needing to add your own custom icons, we’ll have to create an SVG sprite file and pass the path or hosted url to the iconUrl Plyr props.
We’ll get to all that. For now, let’s focus on getting our SVG sprite file ready.
I understand SVG sprite file to be a compressed file containing a list of several SVGs
To achieve this, we’ll be making use of the Grunt package with the grunt-svgstore plugin which helps automate this.
To get started with grunt, run
npm install -g grunt-cli for a global install
npm install grunt-svgstore
Create Gruntfile.js in the root of your project directory. This file is used to configure or define tasks and load Grunt plugins which in our case is the grunt-svgstore plugin
copy and paste this code into your Gruntfile.js
   module.exports = function(grunt) {

    // Project configuration.
    grunt.initConfig({
      pkg: grunt.file.readJSON('package.json'),

      svgstore: {
        options: {
          prefix : 'plyr-', // This will prefix each ID
          svg: { // will add and overide the the default xmlns="http://www.w3.org/2000/svg" attribute to the resulting SVG
            viewBox : '0 0 100 100',
            xmlns: 'http://www.w3.org/2000/svg'
          }
        },
        default : {
            files: {
              'public/svg-defs.svg': ['plyr-svgs/*.svg'],
            }
          },

        },
    });

    // Load the plugin that provides the "uglify" task.
    // grunt.loadNpmTasks('grunt-contrib-uglify');
    grunt.loadNpmTasks('grunt-svgstore');

    // Default task(s).
    grunt.registerTask('default', ['svgstore']);


  };
Here's a little explanation for the snippet above.
we initialise the grunt task runner with the required configurations. The pkg key reads the package.JSON file in the project, while the svgstore object takes options and default objects. The options object has the following keys.
prefix: accepts a string value that will prefix the svg IDs.
svg: It defines settings for the SVG output, such as the viewBox and xmlns attributes.
The default object has the files object property whose key refers to the desired destination for the generated svg sprite file, folder/filename.svg, which In my case is public/svg-defs.svg.
And whose value refers to the path containing the list of source svgs to be converted to sprite. The value is an array of the file path - ['plyr-svgs/.svg'].
What this means is the folder with the list of svg files should be in the array i.e ['source-svg-folder/.svg']. source-svg-folder/ could be any name as in my case is plyr-svgs/
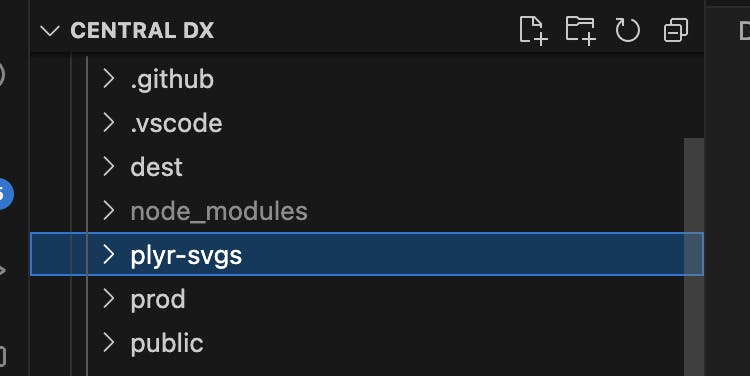
I recommend keeping the source svg folder in the root of your project directory, like so.
Furthermore, we load the grunt-svgstore plugin with grunt.loadNpmTasks('grunt-svgstore')
We also register the grunt task with svgstore as our default plugin. This enables us execute the svgstore task by just running grunt in terminal.
Once you have succesfully setup your Grunfile.js pretty similar to mine. You may run grunt in your terminal. This would generate an svg sprite file in the specified destination folder. yay!
Moving on.
In your video component file, customPlyr.tsx
import Plyr from ‘plyr’;
import Poster from "app/modules/report-module/asset/sneak-peek-poster.svg";
Poster refers to a file path containing an svg image that would be used as the video cover/poster. Replace the file path with yours.
initialize plyr instance :
  //customPlyr.tsx
  import React from "react";
  import CloseIcon from "@material-ui/icons/Close";
  import { IconButton } from "@material-ui/core";
  import Plyr from "plyr";
  import Poster from "app/modules/report-module/asset/sneak-peek-poster.svg";

  export default function CustomPlyr(props: {
    setModalDisplay: (display: boolean) => void;
  }) {
    //The player instance is being used in the background. Seems like an unused variable but it is not.
    const player = new Plyr(".plyr", {
      controls: [
        // "play-large",
        "mute",
        "volume",
        // "airplay",
        "rewind",
        "play",
        "pause",
        "fast-forward",
        "settings",
        "fullscreen",
        "progress",
        "current-time",
        "captions",
        // "pip",
        "airplay",
      ],
      iconUrl: "/svg-defs.svg",
    });
The controls array contains strings that represent the player control buttons. Write them in the order you want the buttons to be displayed on your video player. The iconUrl takes the path to the generated svg sprite.
Return your player element in the render method
  return(

    <div>
              <video
                id="player"
                width="714"
                height="506"
                controls
                data-poster={Poster}
                className="plyr"
              >
                <source src="/ai-sneak-peek.mp4" type="video/mp4" />
                <source src="movie.ogg" type="video/ogg" />
                Your browser does not support the video tag.
              </video>
            </div>
  )
The bulk of the work is done. To further style the video player you can follow the documentation or you can inspect the respective classNames using devoloper tools and override them in your index.css file, like I did
/* videoPlayer.css */
.plyr audio,.plyr iframe,.plyr video {
    display: block;
    height: 100%;
    width:714px;
}


@media (min-width: 480px){

    .plyr--video .plyr__controls {

        width: 83%;
        margin: auto;

        padding-top: 10px;
        /* padding-top: calc(var(--plyr-control-spacing,10px)*3.5); */
    }
}
.plyr--video .plyr__controls {
    background: linear-gradient(#0000,#000000bf);
    /* background: var(--plyr-video-controls-background,linear-gradient(#0000,#000000bf)); */
    background: rgba(45, 45, 45, 0.90);
    bottom: 53px;
    border-radius: 12.188px;
    backdrop-filter: blur(1.9043428897857666px);

}

.plyr--full-ui input[type=range] {
    color: white;

}

.plyr__control svg {
    fill: rgba(45, 45, 45, 0.90);
}

.plyr__volume input[type=range] {

    max-width: 67px;

}
.plyr--video .plyr__control:focus-visible,.plyr--video .plyr__control:hover,.plyr--video .plyr__control[aria-expanded=true] {
background: transparent;
}
The result
